2023年2月16日 星期四

V120102 – Master[存檔]完成, 自動重新顯示 - Ext.getCmp('btn_Show').fireHandler(); - 新增模式

 目的: V120102 – Master[存檔]完成, 自動重新顯示

處理說明:  1>[存檔].onClick ,會先執行 [Template].[存檔].onClick , 再執行本畫面.[存檔].onClick

                   2>Ext.getCmp('btn_Show').fireHandler();  //重新顯示 Master資料


1>*.js  --> 只有目前在[新增]模式, 才重新顯示資料

var is_add=false;

Ext.getCmp('btn_add').on("click", function () {
 setFieldsCls('myform', ['TPCODE', 'DCODE', 'CODENOTE',], ['BITM', 'TPCODE_', 'MKER', 'MKER_', 'MKDT']);
        is_add = true;
    }
    );


//設定 [存檔]鈕, 會先執行 parent 的 onclick 再執行本程式 onclick -->重新開啟 datastore
Ext.getCmp('btn_save').on('click', function () {
       console.log(" 0 btn_save onclick - V120103.onclick");
       if ((is_add==true)) { //若為[新增]模式, 才重新顯示資料
           Ext.getCmp('btn_Show').fireHandler();
         }
         is_add = false;
});

Ext.getCmp('btn_cancel').on('click', function () {
is_add = false;
});

2>*.cs

[HttpPost]
        public void Insert()
        {
            var c = System.Web.HttpContext.Current;
            NameValueCollection nvc = c.Request.Form;
            //excuteInsert(nvc, DBTable);
            NameValueCollection nvc1 = new NameValueCollection();
            foreach (string k in nvc.Keys)
            {
                nvc1[k] = nvc[k];
            }            
               int Tmp_MAXITM = int.Parse(GET_MAX_BITM());
               nvc1["BITM"] = (Tmp_MAXITM + 1).ToString();
                nvc1["MKER"] = LoginUserModel.LoginUserId;
                nvc1["MKDT"] = DateTime.Now.ToString("yyyy/MM/dd");
            excuteInsert(nvc1, DBTable);
        }

        [HttpPost]
        public void Update()
        {
            var c = System.Web.HttpContext.Current;
            NameValueCollection nvc = c.Request.Form;
            NameValueCollection nvc1 = new NameValueCollection();
            foreach (string k in nvc.Keys)
            {
                nvc1[k] = nvc[k];
            }
            nvc1["MKER"] = LoginUserModel.LoginUserId;
            nvc1["MKDT"] = DateTime.Now.ToString("yyyy/MM/dd");
            string[] arrCondition = getPK();            
            excuteUpdate(nvc1, DBTable, arrCondition);
        }

V120102 - 判斷輸入欄位值是否含中文字

 目的: V120102 - 判斷輸入欄位值是否含中文字

處理說明:  1>中文字的內碼  0x4E00~0x9FBB
                   2>檢核每一字元的內碼是否在中文字範圍內 (0x4E00-0x9FBB)


1>*.cs  -判斷字串是否含中文字的函式 
    1>>myfunc.cs  - ContainChinese(string input)  
          - 若含中文字,則傳回 true, 否則 傳回 false
        public static bool ContainChinese(string input)
        {
            string pattern = "[\u4e00-\u9fbb]";
            return Regex.IsMatch(input, pattern);
        }

   2>>V120102APIController.cs
         //[條碼編碼]不可為中文字                            
          if (myfunc.ContainChinese(Tmp_DCODE))
             {
                 Tmp_RtnMsg1 = Tmp_RtnMsg1 + "[條碼編碼]不可含中文字;";
             }                            

2>*.js  V120102.js  -按[存檔]鈕, 判斷字串是否含中文字的函式 
      Ext.getCmp('btn_save').checkFormValue = function () {
        //1>檢核 [條碼編號(DCODE)] 不可含中文字
        console.log(" Ext.getCmp('btn_save').checkFormValue : ");
        var Tmp_Str = Ext.getCmp("DCODE").getValue();
        console.log(" DCODE : ", Tmp_Str);
        for (var i = 0; i < Tmp_Str.length; i++) {
            console.log("char i : ", i);
            if (Tmp_Str.charCodeAt(i) >= 0x4E00 & Tmp_Str.charCodeAt(i) <= 0x9FA5) {
                Tmp_Str = "[條碼編碼("+Tmp_Str+")]不可含中文字,請重新輸入"
                mywarnalert(Tmp_Str);                
                return false;
            }
        }


PS:
/* unicode 判斷是否為中文字
中文:/^[\u4E00-\u9FA5]+$/
數字:/^d+$/(是非負整數哦)
字母:/^[a-zA-Z]{1,30}$/(1到30個以字母串)
*/

2023年2月15日 星期三

ILIAS2SAP_目前F16V進料_工單領料_處理說明

 目的:ILIAS2SAP_目前F16V進料_工單領料_處理說明


2023年2月14日 星期二

GitLab -認可@推送的目的- (目前修改中的Source(V120102)中,但臨時要上版另一支Source(V120502-原本已上版但再次修改)

目的: 1>GitLab目前分支(A)修改中Source(V120102) , 

          2>但使用者測試正式區 V120502 有問題,
               (經修改V120502後 , 要如何只上版 V120502 (不含修改中的 Source V120102)


處理說明: 1>修改完成目前SourceA,並認可 --> 存入本機分支 A(Source A+B)

                  2>提取master,只修改SourceB(分支B) --> 認可+推送 --> merge 至遠端 GitLab master

                      --> 不可以  master 推送

                  3>繼續的原本程式(分支A: Source A+B)


1>修改完成目前SourceA,並認可 --> 存入分支 A(Source A+B)
     --> 認可, 只儲入本機的GitLab儲存庫


2>提取master,只修改SourceB(分支B) --> 認可+推送 --> merge 至遠端 GitLab master

  詳如另一篇 Blogger: 
GitLab 操作說明(如何同步遠端 master 回來)

3>繼續的程式(分支A: Source A+B)


2023年2月7日 星期二

V120202B : css - div margin border 的用法 - table cellsapcing - cellpadding border 的用法

 目的: V120202B css - div  margin  border 的用法   - table   cellsapcing - cellpadding border 的用法

           HTML online : https://www.tutorialspoint.com/online_html_editor.php

處理說明: 1> 設定標籤的長寬 & 標籤的列印位置往右移 & 設定邊線寬度
                       <div id='print_area' style='width:10cm;height:4cm;margin:0px 0px 0px 20px;
                         border:5px solid green;'>

                  2>設定  table 的 邊線間距(cellspacing) , 邊框2文字間距(cellpadding=0)
<table id='my_tbl1' style='width:100%; margin:0px 0px 0px 10px;' border=1px borderstyle='solid' bordercolor='blue' cellspacing=0 cellpadding=0>
 
                 3>  <table> row底線
<td width=35% style='border-bottom:1px solid black;'>機號:"+Tmp_ASN+"</td>
<td width=35% style='border-bottom:1px solid black;' >工號: "+Tmp_SAPNO+"</td>


1>範例1 : <div> marin padding


*.html
<div id='print_area' style='width:10cm;height:4cm;border:5px solid green;
margin:0px 0px 0px 20px;padding:0px 0px 0px 10px;'>
<div id='my_div_1' style='width: 9.8cm; height: 3.5cm;border: 1px solid brown;font-size:0.5pt;'>
<table id='my_tbl1' style='width:100%; margin:0px 0px 0px 10px;' border=1px borderstyle='solid' bordercolor='blue' cellspacing=0>
<tr>
<td width=35%>機號: A049 </td>
<td width=35% '>工號: 12345678</td>
<td width=35% '>工單件號: SROPN_1 </td>
</tr>
</table>


2>範例2 : <table> margin cellspacing cellpadding
*.html
<table id='my_tbl1' style='width:100%;margin:0px 0px 0px 10px;' cellpadding=6 border=1px borderstyle='solid' bordercolor='blue' cellspacing=2>

<tr>
<td width=35%>機號: A049 </td>
<td width=35% '>工號: 12345678</td>
<td width=35% '>工單件號: SROPN_1 </td>
</tr>
</table>


3> <table> row底線


<div id='print_area' style='width:10cm;height:4cm;border:5px solid green; margin:2px 5px 1px 15px;'>
<div id='my_div_1' style='width: 9.8cm; height: 3.5cm;border: 1px solid yellow;font-size:4pt; margin:2px 5px 1px 15px; '>
<table id='my_tbl1' style='width:100%;padding:0 0 0 10;' border=0px borderstyle='solid' bordercolor='blue' cellspacing=0>
<tr style="border-bottom:1px solid blue">
<td width=35% style='border-bottom:1px solid black;'>機號: A049 </td>
<td width=35% style='border-bottom:1px solid black;'>工號: 12345678</td>
<td width=35% style='border-bottom:1px solid black;'>工單件號: SROPN_1 </td>
</tr> </table>


Sample:


Source:   

<!DOCTYPE html>
<html>
<head>
<style>
div {
  background-color: lightgrey;
  width: 300px;
  height: 200px;
  border: 15px solid green;
  padding: 50px;
  margin: 20px;
}
</style>
</head>
<body>

<h2>Demonstrating the Box Model</h2>

<p>The CSS box model is essentially a box that wraps around every HTML element. It consists of: borders, padding, margins, and the actual content.</p>

<div>This text is the content of the box. We have added a 50px padding, 20px margin and a 15px green border. Ut enim ad minim veniam, quis nostrud exercitation ullamco laboris nisi ut aliquip ex ea commodo consequat. Duis aute irure dolor in reprehenderit in voluptate velit esse cillum dolore eu fugiat nulla pariatur. Excepteur sint occaecat cupidatat non proident, sunt in culpa qui officia deserunt mollit anim id est laborum.</div>

</body>
</html>


V120502B - 標籤列印 & 二維條碼列印 & 列印方向: 橫向/直向

 目的: V120502- 標籤列印  &  二維條碼列印(V120502B)

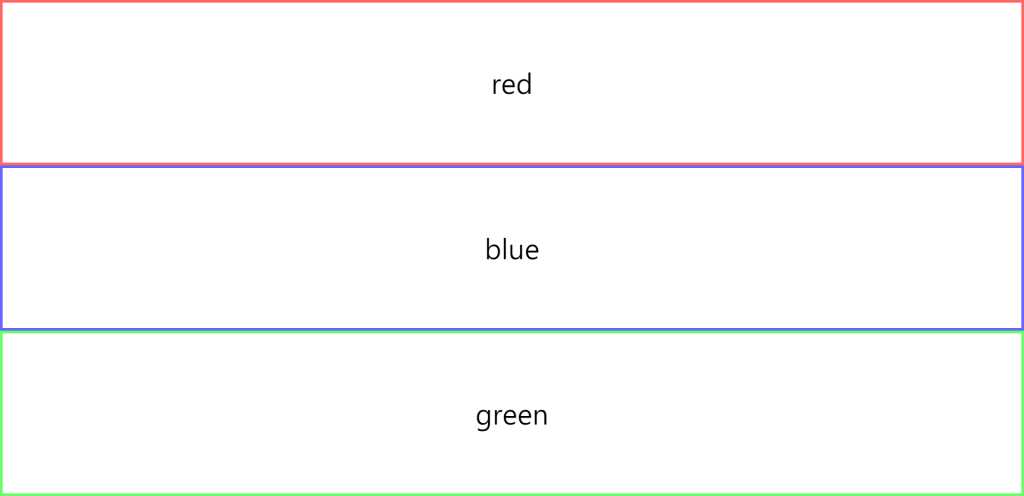
處理說明: 1> 如下以  <div> & <table> 畫出標籤內容
                            <div  id= my_div1>   
                            <table  id= my_tbl1 >   
                            <div  id=my_barcode1>   
                            <div  id= break_page1>   
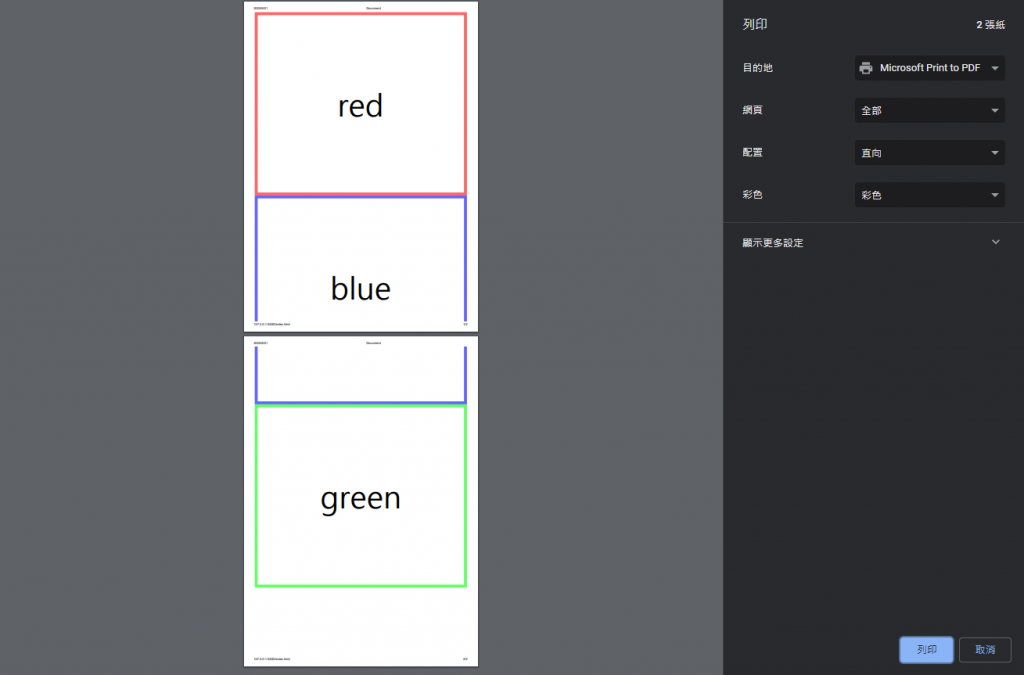
                  2>預覽列印                     $('#my_div1,#my_barcode1,#break_page1,#my_div2,#break_page2,#my_div3').printThis({});
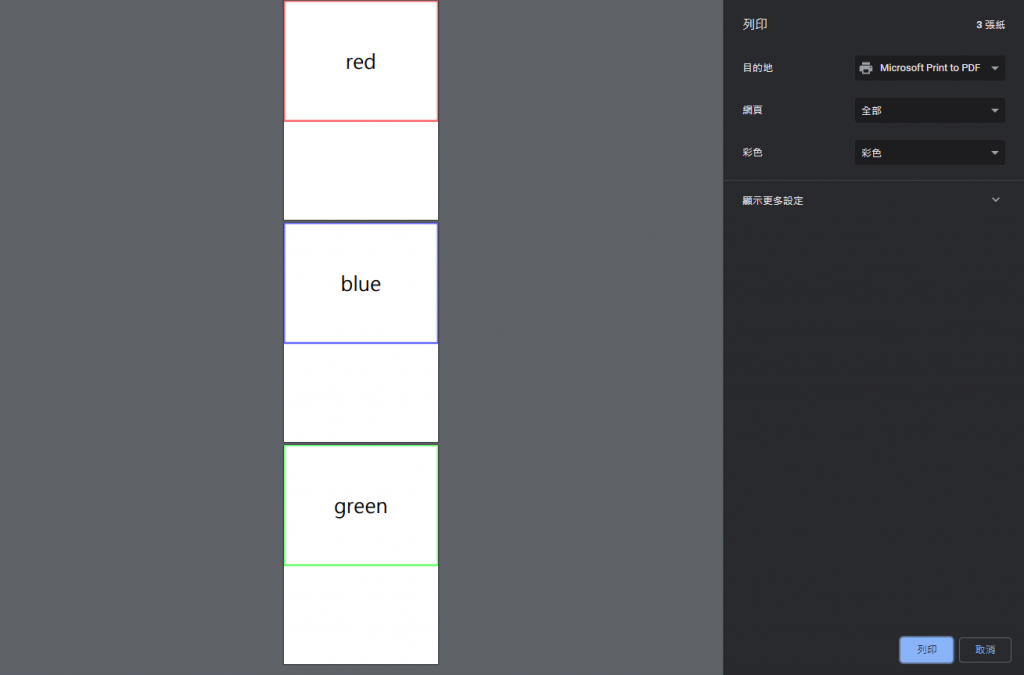
0>印表機設定:

    標籤樣式: USER: 100mm*60mm 
    襯紙寬度:  左: 2mm  右: 2mm
    方冋:  直向


1>標籤列印 :


2>二維條碼列印


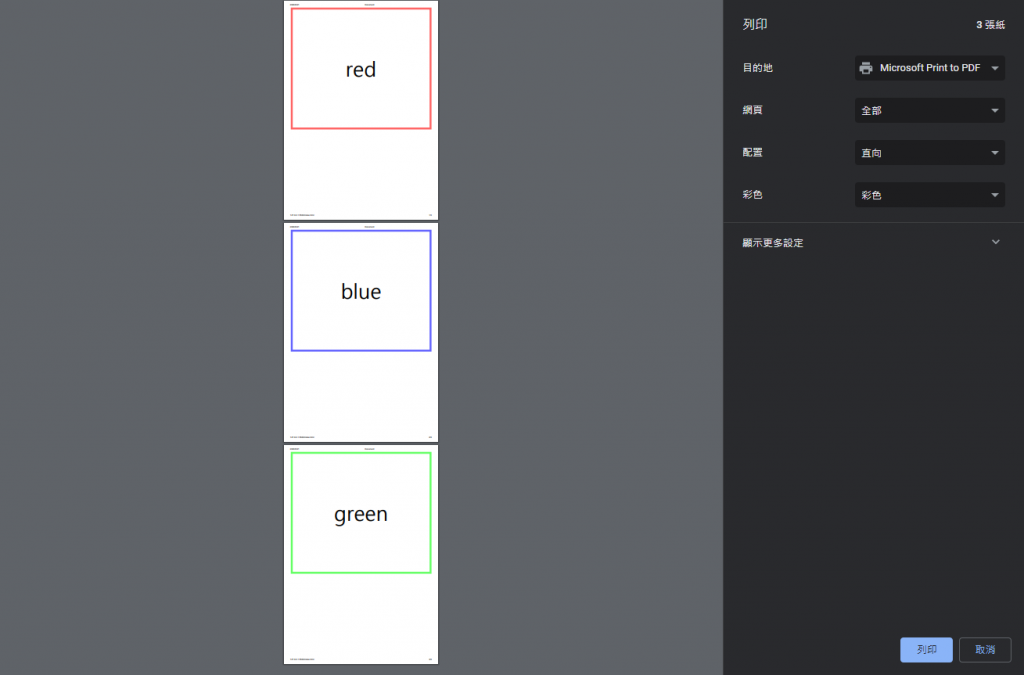
3>列印方向:橫向/直向 - print.css
/*    size: portrait; //* 直向 
       size: landscape; //* 橫向 
       size: A4;  //* 紙張大小 
       size: A4 portrait; //* 混合使用 
       margin: 0; //* 邊界與內容的距離 
*/
@media print {
    @page {
        size: portrait;
    }
}


1>*.js  - V120502B.js
//預覽列印
function mySub1_OkBtn2_click() {
    //組合  print_div    
    //取得是否列印日期
    var cur_rec, Tmp_AMMNO, Tmp_CHECK, Tmp_SAPNO, Tmp_PN, Tmp_QTY, Tmp_EOCND, Tmp_RMK, Tmp_DT;
    var Tmp_sub_DT = Ext.getCmp('sub_DT').getValue();
    console.log("Tmp_sub_DT:", Tmp_sub_DT);
    if (Tmp_sub_DT == true)
        Tmp_DT = "";
    else
        Tmp_DT = DatetoStr(now, "Y/m/d");

    //取得 sub_store;
    var Tmp_sub_Grid = Ext.getCmp('sub_Grid');
    var Tmp_sub_store = Tmp_sub_Grid.store;  //= gridstore        
    var Tmp_PageCnt = Tmp_sub_store.getCount();
    if (Tmp_PageCnt == 0) {
        var Tmp_Str = "請先選擇要列印的資料!!"
        mywarnalert(Tmp_Str);
        return;
    }
 
    var Tmp_uni = "0";
    var Tmp_barcode_text = "";
   var pub_print_area_Str1 = "<div  id='print_area'   style='border: 5px solid green;'>";
    //my_div1
    for (i = 0; i < Tmp_PageCnt; i++) {
        //console.log("更新第 i  筆", i);
        //依目前 store的資料, 更新 AMM_FACDEPD.NWK , PK( DT+DEP+EMPLYID)
        cur_rec = Tmp_sub_store.getAt(i);
        Tmp_AMMNO = cur_rec.data["AMMNO"];
        Tmp_CHECK = cur_rec.data["CHECK"];
        Tmp_SAPNO = cur_rec.data["SAPNO"];
        if (checkisnull(Tmp_SAPNO))
            Tmp_SAPNO = "";
        Tmp_PN = cur_rec.data["PN"];
        Tmp_QTY = cur_rec.data["QTY"];
        Tmp_EOCND = cur_rec.data["EOCND"];        
        Tmp_RMK = cur_rec.data["RMK"];
        if (checkisnull(Tmp_RMK))
            Tmp_RMK = "";
        Tmp_uni = (i + 1).toString();
        //barcode 文字=件號&ECNO&日期&數量&工號&備註(機號)
        Tmp_barcode_text = Tmp_PN + "&"
            + Tmp_EOCND + "&"
            + Tmp_DT + "&"
            + Tmp_QTY + "&"
            + Tmp_SAPNO + "&"
            + Tmp_RMK;


        pub_print_area_Str1 = pub_print_area_Str1
     + "<div  style='width: 6cm; height: 7cm;border: 1 px solid yellow;' id='my_div" + Tmp_uni + "'>"
     + "<table  id = 'my_tbl" + Tmp_uni + "' style='width: 95%; height: 5cm; font-size: 10pt;
                margin-top: 5pt;margin-left: 5pt; border-collapse:collapse;' border=1px  borderstyle='solid'   bordercolor='black' > "
      + "<tr   ><th width=30% style='transform: scale(0.7);'>件號<br>(PART NO)</th>
           <td width=70%>" + Tmp_PN + "</td></tr>"
      + "<tr   ><th width=30%  style='transform: scale(0.7);'>EO號碼<br>(EONO)</th><td width=70%>" + Tmp_EOCND + "</td></tr>"
      + "<tr   ><th width=30%  style='transform: scale(0.7);'>日期<br>(DATE)</th><td width=70%>" + Tmp_DT + "</td></tr>"
      + "<tr  ><th width=30%  style='transform: scale(0.7);'>數量<br>(QTY)</th><td width=70%>" + Tmp_QTY + "</td></tr>"
      + "<tr   ><th width=30% style='transform: scale(0.7);'>工令單號<br>(SOR NO)</th><td width=70%>" + Tmp_SAPNO + "</td></tr>"
      + "<tr  ><th width=30%  style='transform: scale(0.7);'>品保<br>(QC)</th><td width=70%></td></tr>"
      + "<tr  ><th width=30%  style='transform: scale(0.7);'>備註<br>(REMARK)</th><td width=70%>" + Tmp_RMK + "</td></tr>"            
            + "</table>"
            + "<table  id = 'my_bottom" + Tmp_uni + "' style='width: 100%; line-height: 9pt; font-size: 7pt;border-collapse:collapse;'  > "
            + "<tr >"
            + "<th width = 30% style='transform: scale(0.7);' >04/2004<br></th> "
            + "<td width = 70% style='transform: scale(0.7);'  align='right' >TAG-DR-006</td>"
            +"</tr > "
            + "</table>"
            + "</div>"
            + "<div id='my_div_barcode" + Tmp_uni + "' style='margin-top: 10pt;margin-left: 30pt; font-size: 6pt;' >"
            + genQRcodeStr(Tmp_barcode_text,90,90,false)
            + "</div>"

            //分頁        
            + "<div class='display' id='break_page" + Tmp_uni + "' style='break-after:page'></div>";

    };  // for (i = 0; i < Tmp_PageCnt; i++) {

    console.log("pub_print_area_Str1:", pub_print_area_Str1);
    //將 [預覽列印]的 Table_div String 加入 子視窗.panel
    //將上次的列印資料 remove()
    $("#print_area").remove();
    var Tmp_sub_panel4 = $('#sub_panel4');
    console.log("Tmp_sub_panel4:", Tmp_sub_panel4);
    Tmp_sub_panel4.append(pub_print_area_Str1);
    var Tmp_Str = "<link type='text/css' rel='stylesheet' href='../JsFunction/print.css?v=@date' " + " media='print'>";
    $('head').append(Tmp_Str);
    console.log("0 $('#sub_panel4').width:", $("#sub_panel4").width());
    console.log("0 $('#sub_panel4').heigh:", $("#sub_panel4").height());     
    //顯示 [二維條碼] 在下方的 panel(sub_panel4)
    var Tmp_prn_div_Str = "";
        for (i = 0; i < Tmp_PageCnt; i++) {
            Tmp_uni = (i + 1).toString();
            Tmp_prn_div_Str = Tmp_prn_div_Str + "#my_div" + Tmp_uni;
            //新增 [二維條碼] 預覽列印
            Tmp_prn_div_Str = Tmp_prn_div_Str + ",#my_div_barcode" + Tmp_uni;
            if (i != (Tmp_PageCnt - 1))
                Tmp_prn_div_Str = Tmp_prn_div_Str + ",#break_page" + Tmp_uni + ",";
        }
        //if (Tmp_prn_div_Str.length > 0)
            //Tmp_prn_div_Str = Tmp_prn_div_Str + "'";
    console.log("Tmp_prn_div_Str:", Tmp_prn_div_Str);
        //預覽列印
        //$('#my_div1,#break_page2,#my_div2,#break_page3,#my_div3').printThis({
        $(Tmp_prn_div_Str).printThis({
            importCSS: false, // import parent page css  
            importStyle: false, // import style tags        
            loadCSS: "../JsFunction/print.css?v=@date", // path to additional css file - use an array [] for multiple                
        });
    }


2>print.css  - 設定列印方向
@page {
    size: auto; /* auto is the initial value */
    /* margin: 0mm 10mm 0mm 10mm; */ /* this affects the margin in the printer settings 最關鍵參數
    margin: 0mm 0mm 0mm 0mm;
    /*margin-left: 0mm;*/
}

body {
    /*background-color: #FFFFFF;*/
    margin: 0mm;  /* this affects the margin on the content before sending to printer */
    /*padding: 5mm 0 5mm 0;*/
}

/*    size: portrait; //* 直向 
       size: landscape; //* 橫向 
       size: A4;  //* 紙張大小 
       size: A4 portrait; //* 混合使用 
       margin: 0; //* 邊界與內容的距離 
*/
@media print {
    @page {
        size: portrait;
    }
}


4>印表機設定畫面


V120502B 顯示 二維條碼 圖示 - genQRcodeDiv("mypanel", "5325YET064602&test&123eee"); - genQRcodeStr("TEST QRCODE",90,90);

目的: V120502B 產生二維條碼的圖案

處理說明:  1> 二維條碼 函式庫:  myfunc.js
                         Ext.Loader.loadScript({    url: '../JsFunction/qrcode.js'});
                          //barcode 文字(Tmp_barcode_text)=件號&ECNO&日期&數量&工號&備註(機號)   
                          genQRcodeStr(Tmp_barcode_text,90,90,false);

                    2>[顯示二維修碼] 鈕
                        //將 QRCODE 圖片放於 sub_panel4                        
                       genQRcodeDiv("sub_panel4", "5325YET064602&test&123eee");


1>*.js  
- myfunc.js

Ext.Loader.loadScript({
    url: '../JsFunction/qrcode.js'
});

/*
//產生二維條碼的範例 -
 var mypanel = new Ext.Panel({
        id: 'mypanel',
        layout:'fit'
    });

1>>於 DOM元件 加入  二維條碼圖片  - genQRcodeDiv
      Ex: genQRcodeDiv("mypanel", "5325YET064602&test&123eee");
  
 function genQRcodeDiv(destId, v, cm_x, cm_y) {
    //參考網址:https://github.com/papnkukn/qrcode-svg
    var qrcode = new QRCode({
        content: v,
        join: true, //Crisp rendering and 4-5x reduced file size
        width: 100, //px
        height: 100, //px,
        padding: 0
    });
    var svg = qrcode.svg();

    //$('<div></div>').html(svg+'<br>'+v).appendTo('#' + destId);
    document.getElementById(destId).innerHTML = svg + '<br>' + v;
}

2>>產生  二維條碼圖片字串  - genQRcodeStr
       Ex: Tmp_Str=Tmp_Str+ "<div id='my_div_barcode" + Tmp_uni + "'>"
                                                + genQRcodeStr("TEST QRCODE")
                                                +"</div>" ;

 function genQRcodeStr( v, px_w, px_h, is_showtxt) {
    //參考網址:https://github.com/papnkukn/qrcode-svg
    if (checkisnull(px_w))
        px_w = 50;
    if (checkisnull(px_h))
        px_h = 50;
    var qrcode = new QRCode({
        content: v,
        //container: "svg-viewbox", //Responsive use
        join: true, //Crisp rendering and 4-5x reduced file size
        width: px_w, //px
        height: px_h, //px,
        padding: 0
    });
    var svg = qrcode.svg();
    var Tmp_RtnStr = svg + '<br>' ;
    if (is_showtxt)
        Tmp_RtnStr = Tmp_RtnStr + v;
    console.log("QR Code Str", Tmp_RtnStr);
    return Tmp_RtnStr;


3>> V120502.js - [顯示二維條碼]
{
                            xtype: 'button',
                            id: 'sub_btn_OK',
                            flex: 3,
                            border: 1,
                            text: '二維標籤 ',  //sub2
                            hidden: true,
                            iconCls: 'icon-search',
                            handler: function () {
                               //顯示 [二維條碼] 在下方的 panel(sub_panel4)
                              genQRcodeDiv("sub_panel4", "5325YET064602&test&123eee");
                            }
                        },  // end of 確定                                        


PS: 條碼套件使用參考文件 -

Ext.Net 1.2.0_演示 Ext.Net+QR 码封装条形码控件

https://www.cnblogs.com/liuning8023/archive/2012/05/20/2511015.html


2023年2月2日 星期四

網頁列印 - 紙張方向: 橫向(landscape) / 直向(portrait) 的設定說明

 https://ithelp.ithome.com.tw/articles/10232006


今天要來介紹一個比較不常用的東西,那就是 CSS 中的列印,在以前常常會將網頁列印出來,所以經常會使用到這個屬性,時到今日,使用的時機越來越少,只有一些報表有用到,因此今天就讓我們一起看看吧!

首先我們有一個畫面,裡面有三個區塊,如下:

<body>
  <div class="page">
    <div class="box red">red</div>
  </div>
  <div class="page">
    <div class="box blue">blue</div>
  </div>
  <div class="page">
    <div class="box green">green</div>
  </div>
</body>
* {
  padding: 0;
  margin: 0;
}
.box {
  display: flex;
  justify-content: center;
  align-items: center;
  font-size: 100px;
  height: 600px;
}
.red {
  border: 10px solid #f66;
}
.blue {
  border: 10px solid #66f;
}
.green {
  border: 10px solid #6f6;
}

print-page

列印方法

  • 直接網頁上右鍵列印(Ctrl+P
  • 使用 javascript 的 window.print()

如果想列印指定元素可以使用 javascript 另開分頁後列印

// 例:這邊只想列印 red 區塊
const content = document.querySelector(".red").innerHTML;
const newPage = window.open("", "", "width=1000,height=500");
newPage.document.write(content);
newPage.print();

或是使用可以接下來要介紹的 CSS 來控制

CSS 列印樣式

首先我們先來看看目前列印出來的樣式
print-origin
是不是看到了一些問題呢?

  • 頁首頁尾有怪東西
  • 同一區塊被斷開

其實列印的時候預設會有日期網頁標題網址頁碼,不過看起來有點醜,那麼如何解決哩?這邊就用到 CSS 的語法囉!

換頁

首先處理換頁的部分,這邊介紹兩個屬性,可以在列印時達到換頁的效果

.page {
  page-break-inside: avoid; /* 若順著向下排列時會切開此元素,則直接換頁 */
  page-break-after: always; /* 碰到此元素會直接換頁 */
}

print-break

@page

再來則是頁首頁尾,在 CSS 內可以使用 @page 來設定基本的列印樣式

  • size:設定列印的尺寸與方向,可依照紙張調整
  • margin:設定每頁邊界與內容的距離,小於一定數值時,則會將預設的標題等蓋過
@page {
  size: portrait; /* 直向 */
  size: landscape; /* 橫向 */
  size: A4; /* 紙張大小 */
  size: A4 portrait; /* 混合使用 */
  
  margin: 0; /* 邊界與內容的距離 */
}

設定好之後頁首頁尾就乾淨多了,如果想要上方有距離可自行設定 padding 或是 @page 內的 margin
print-@page

頁碼

剛剛將預設的東西清掉後雖然乾淨多了,不過如果還想留下頁碼怎麼辦!?這邊提供一個製作頁碼的方法

CSS 中其實有預設可用的計數器,功能有三個,分別是初始化增加取用

body {
  counter-reset: page-number; /* 初始化,名字可自訂,數值為0 */
}
.page {
  page-break-inside: avoid;
  position: relative;
  min-height: 100vh;
}
.page::after {
  content: counter(page-number); /* 取用該名字的計數器 */
  counter-increment: page-number 1; /* 增加計數器數值 */
  position: absolute;
  right: 0;
  bottom: 0;
  left: 0;
  font-size: 30px;
  text-align: center;
}

完成之後如下圖
print-page-number
此方法是定位在 page 這個 class,若是 page 的高度太高的話就不適用了

@media print

我們完成頁碼之後發現,不是在列印時也有頁碼,而且因為剛剛加上了 height: 100vh,所以也不會正常的排列了
print-all
這時候就可以用到列印中最重要的東西了,也就是 @media print,他的概念跟 @media screen 一樣,一個是螢幕的樣式,而另一個則是列印的樣式,已經會 RWD 的應該很好上手,那就讓我們來修改一下剛剛的問題吧!

@media print {
  .page {
    page-break-inside: avoid;
    position: relative;
    min-height: 100vh;
  }
  .page::after {
    content: counter(page-number);
    counter-increment: page-number 1;
    position: absolute;
    right: 0;
    bottom: 0;
    left: 0;
    font-size: 30px;
    text-align: center;
  }
}

修改完成後就大功告成了,網頁上的樣式還是本來的樣式,而列印時改成了三頁,而且顯示頁碼

結語

之前我也不是很認識列印的屬性,剛好最近工作上用到才知道,基本上都跟 RWD 的概念一樣,只是多了幾個屬性可以用,用起來還算容易,不過能看到自己做的東西照著想像的樣子印出來還是相當療癒阿!哈哈